A guide to Azure OpenAI Service – Full guide + code samples
A guide to Azure OpenAI Service – Full guide + code samples
Azure OpenAI Service is a cloud-based artificial intelligence platform developed by Microsoft that allows developers to easily build, deploy, and manage AI models. This platform provides access to powerful machine learning algorithms and pre-trained models to help you create various applications, from chatbots and natural language processing to image recognition.
This post will guide you through getting started with Azure OpenAI Service. We will cover everything you need to know, from setting up your Azure account and creating a new project to using the service to make API calls. We will also provide some examples and working code you can copy/paste and run.
Table of Contents
- Setting up Your Azure Account
- Creating a New Project
- Creating an OpenAI Resource
- Authentication and API Keys
- Making API Calls
- Examples and Working Code
To get started, you must first sign up for an Azure account if you don’t already have one. You can sign up for a free trial account here, which gives you access to various Azure services.
- Creating a New Project
After signing up for an account, you need to create a new project. Follow these steps:
- Log in to the Azure Portal.
- Click on ‘Create a resource’ in the left-hand menu.
- Search for ‘OpenAI’ in the search bar and select the ‘OpenAI Service’ resource.
- Click on the ‘Create’ button to start creating a new OpenAI Service project.
3. Creating an OpenAI Resource
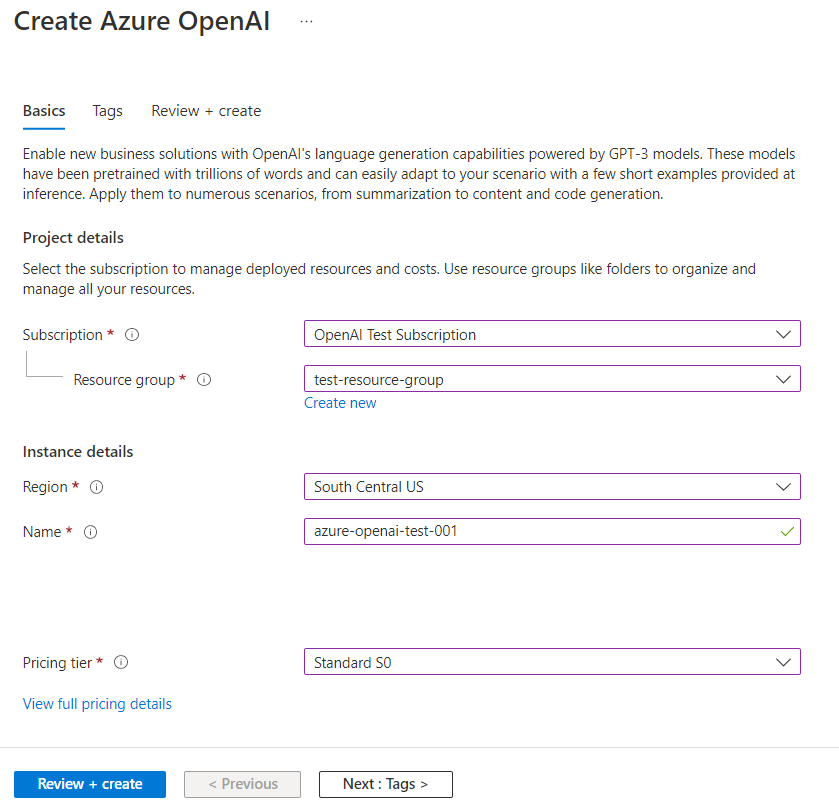
To create an OpenAI resource, follow these steps:
- Fill in the necessary details in the ‘Basics’ tab, such as subscription, resource group, and resource name.
- Choose the region closest to your location for better performance.
- Select the pricing tier that suits your needs.
- Click on the ‘Review + create’ button to review your settings and then click ‘Create’ to deploy your OpenAI Service resource.
- Authentication and API Keys
You must obtain an API key to interact with the OpenAI Service API. Follow these steps:
- In the Azure portal, navigate to your OpenAI Service resource.
- Click on the ‘Keys and Endpoint’ tab in the left-hand menu.
- Copy the primary or secondary API key.
- Making API Calls
To make API calls, you can use the Azure OpenAI Python SDK. Install the SDK with the following command:
|
|
The following Python code demonstrates how to initialize the OpenAI Service client and make an API call:
|
|
Here are some common tasks with the Azure OpenAI Service API. You can copy/paste and run these code snippets after replacing the API key with your own.
6. Examples and Working
Example 1: Text Summarization
This example demonstrates how to use the OpenAI Service API to summarise a given text.
|
|
Example 2: Sentiment Analysis
This example shows how to perform sentiment analysis on a given text using the OpenAI Service API.
|
|
Example 3: Question-Answering
This example demonstrates how to use the OpenAI Service API to answer a question based on a provided context.
|
|
Conclusion
In this blog post, we provided a comprehensive guide to help you get started with Azure OpenAI Service. We covered setting up your Azure account, creating a new project and resource, authenticating with API keys, and making API calls using the Python SDK. Additionally, we provided some examples and working code snippets that you can use as a starting point for your projects.
Now that you have a solid understanding of Azure OpenAI Service, you can begin exploring its capabilities and integrating it into your applications. Happy coding!

